It is always fun and encouraging to create a wall calendar where we are able to include the most special pictures and important events every year. Moreover, it is very useful and also a rather cherished and unique present. Here is the simplest way to create a personalised wall calendar with photos within the following five steps.
Step 1: Collect Your Resources
The first process in generating a do-it-yourself wall calendar is to round up the materials you’re going to use. Here’s what you’ll need:
Photos:
Select 12 pictures, one for each of the months. These can be the pictures of your loved ones, family members, dogs, cats, places you have visited, or any type of photo you like.
Calendar Template:
There are different free printable calendar templates that are available online or you can also make use of the calendar-making software or app.
Paper and Printer:
If you plan to print the calendar at home, then high-quality photo paper should be chosen. Otherwise, you might opt for the usual paper and let a professional print it for you.
Binding Materials:
You may use a binding machine, staples, or even hole punch and string to bind your calendar.
Decorative Supplies:
Some people prefer to use stickers, markers, and other enhancements to give that personal touch to the calendar.
Step 2: Selection of Design and Layout
Choosing the design and layout is also an important step in the process, as it is interesting. There are several approaches that can be made when it comes to customising your calendar, depending on the level of your imagination and tools available. Here are some options:
Online Calendar Makers:
Shutterfly, Vistaprint, Canva and other websites have graphical interfaces through which users can create their own calendars easily. It allows you to upload your photos, to select one of the offered templates and to modify each page in turn.
Photo Editing Software:
Other ones, for example, Adobe Photoshop or Canva help to come up with a more individualistic design. You can select the overall look of the picture, enter a caption and place a variety of additional figures.
Pre-made Templates:
If you do not want all the complexities of the aforementioned options, there are available templates of calendars which can be easily edited by your photos and then printed at home.
Step 3: Customise Each Month
After having your design and layout, you will need to add your content for each of the months in your calendar.
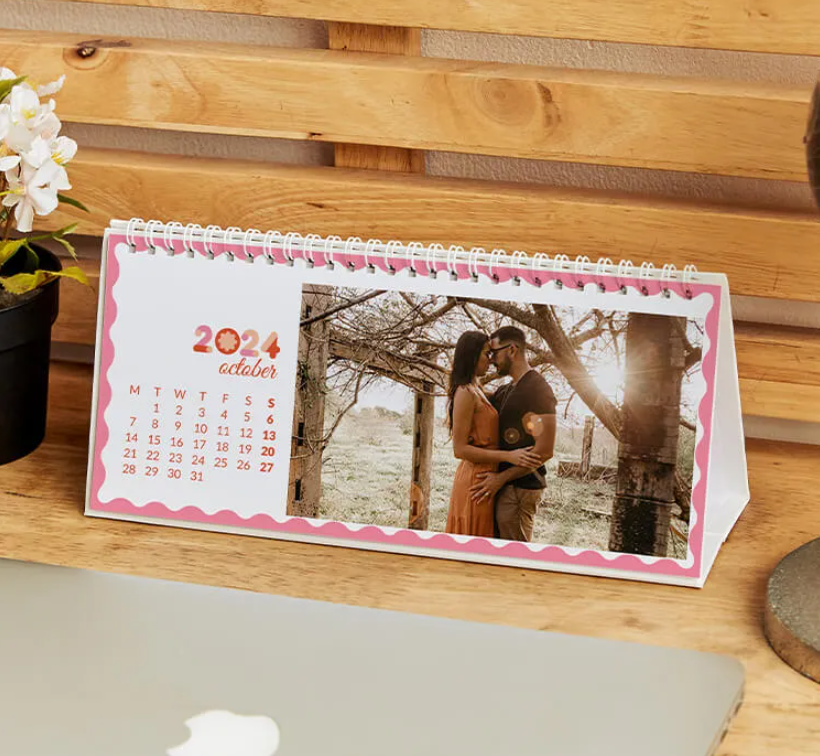
Insert Photos:
Place the photo you chose for them on each month’s page. Make sure that the photo taken has sufficient resolution to be printed very clearly.
Mark Important Dates:
Customise your calendar by drawing squares around dates like birthdays, anniversaries and other holidays. It is also okay to include fun activities, for example, family reunions or even vacations.
Add Captions or Notes:
Ensure that you add captions or notes at the end of each month to make the layout more unique. Some special features you may want to include are quotes, jokes or messages that are special to you.
Decorate:
Avoid having all the pages looking plain by using stickers, borders and other decorations that will make each page look different.
Step 4: Print Your Calendar
Taking a print out of your calendar is the next important step.
Print at Home:
If you have access to a great printer, then you should be able to print the calendar sheets at home. Make sure to use the best print settings and high-quality paper to maximise the brightness of the colours and sharpness of the pics.
Professional Printing:
If you prefer a more professional touch then it is advisable to go and get your prints at a professional print shop. Most online services simply require you to upload your design and they will have your calendar printed and shipped to you.
Double-Check:
It is worth reviewing each and every page carefully and thoroughly before going for print. Make sure that all pictures are placed where they should be placed, and all the dates are correct.
Step 5: Bind Your Calendar
The final step is to bind your calendar. Here are some methods to choose from:
Spiral Binding:
To prepare a spiral-bound calendar, you have to laminate the calendar using a binding machine. This method is long-lasting and ensures the calendar doesn’t hang loosely on the wall of the structure.
Stapling:
Sew along the edge using a sewing machine or staple the papers on the top part or use a long staple gun to join them on the side.
DIY Binding:
Puncture a hole at the corners of each page then you thread a ribbon or string through the holes. This warms up your calendar giving it a handmade feel.
Zoomin – A Brand for Personalised Goodies
If you do not have the time to make one, you need not worry as Zoomin is here to get that done for you. They are a brand known for their unique, super quality personalised products. If you want to have a personalised calendar with photos, all you have to do is reach out to the Zoomin website and the rest will be taken care of easily! Check out their other personalised goodies that are popular as well.
Making your own personalised calendar with photos is a very fulfilling and meaningful activity that has a functional purpose as well. With these five guidelines: getting the materials, deciding the design and layout, planning for each month, printing and binding, one can create a lovely and functional calendar that one can look at every day and stay organised throughout the year. Custom wall calendars are perfect when you want one for your own or as a gift, to commemorate the year behind us and to look forward to the year ahead.